RSS

Blog

Why Glass and Acrylic Splashbacks Are Better: The Clear Winners for Modern Kitchens

Why Glass and Acrylic Splashbacks Are Better: The Clear Winners for Modern Kitchens


When it comes to designing the perfect kitchen, every detail matters — and your splashback can completely transform how your space looks and feels. Among the many materials available, glass and acrylic splashbacks are leading the way in both style and practicality. Here’s why they’re the better choice for modern homes.


1. Sleek, Modern Aesthetic

Glass and acrylic splashbacks offer a smooth, reflective finish that makes any kitchen look clean and contemporary. Unlike tiled walls, which require grout lines, these materials create a seamless surface that enhances light and space.


If you love bold, modern interiors, explore the Coloured Splashbacks collection at DIY Splashbacks — featuring over 500 shades to perfectly match your style.


2. Endless Colour & Design Options

One of the biggest advantages of glass and acrylic is the variety of design and colour possibilities.

Glass splashbacks can be back-painted in virtually any colour, offering a luxurious, glossy look.

Acrylic splashbacks are lightweight, available in vibrant shades, and even allow for custom printed designs.


Need help deciding on a shade? Check out the guide on Choosing the Perfect Splashback Colour for inspiration.


3. Easy to Clean & Hygienic

Unlike tiles, which can trap grease and dirt in grout lines, glass and acrylic surfaces are non-porous. A simple wipe with a damp cloth keeps them sparkling clean.


For long-term maintenance tips, visit How to Keep Your Splashback Clean: All You Need to Know.


4. Durable and Heat-Resistant

Toughened glass is highly resistant to heat, making it ideal for use behind hobs and cooktops. 

Acrylic is impact-resistant and flexible — perfect for walls away from direct heat sources.


To understand the difference in quality and durability, you can explore Understanding Splashback Manufacturing Standards.


5. Quick and Easy Installation

Both materials are known for simple, clean installation.

Glass panels are custom-cut to fit your exact wall dimensions.

Acrylic sheets are lightweight and easy to handle, making them great for DIY projects.


Curious about how it’s done? Read How Are Glass Splashbacks Fitted: A Complete Installation Guide for step-by-step details.


6. Adds Value to Your Home

A professionally fitted glass or acrylic splashback not only looks amazing — it also adds value to your kitchen. Its sleek finish, durability, and easy upkeep make it an attractive selling point for future buyers.


In Summary

Whether you choose glass for its luxurious shine or acrylic for its affordability and flexibility, both materials deliver exceptional performance and style.


Explore the full range of Glass and Acrylic Splashbacks available at DIY Splashbacks to find the perfect fit for your home.


Tip:

For areas behind your hob, choose toughened glass.

For other walls or budget-friendly upgrades, acrylic is an excellent alternative.

Colored Splashbacks: Choosing the Perfect Shade for Your Kitchen

Coloured Splashbacks: Choosing the Perfect Shade for Your Kitchen

When designing a modern kitchen, colored splashbacks have become a stylish and practical choice. They don’t just protect your walls from spills and stains — they also bring personality, depth, and energy to your space. But with endless colour options available, how do you choose the perfect shade for your kitchen splashback?


Here’s a guide to help you pick the right hue and finish to elevate your kitchen design.

1. Match Your Splashback Colours to Your Kitchen Style

Your splashback should blend seamlessly with your kitchen’s existing colour scheme — cabinets, benchtops, flooring, and appliances all play a role.

Neutral kitchens (white, grey, or black) look stunning with bold splashback colours like emerald green, navy blue, or ruby red.

Warm-toned kitchens (timber, beige, or cream) pair beautifully with earthy splashback colours such as olive, bronze, or burnt orange.

Cool-toned kitchens (grey, blue, or white) shine with soft pastels or metallic finishes for a light-reflective, airy feel.


 Pro Tip: Always test your colour choices under your actual kitchen lighting before finalizing — the same shade can look very different depending on the light.


2. Consider Lighting for Your Kitchen Splashback

Lighting can dramatically change the look of your glass splashback or acrylic splashback colour.

Natural light makes light or bright colours feel spacious and clean.

LED or warm artificial lighting can deepen colours or add a cozy glow.

If your kitchen has limited natural light, opt for glossy or reflective splashback finishes — they help bounce light around and make the room feel bigger.


3. Choose Colours That Match Your Mood

The colour you choose for your splashback influences the overall feel of your kitchen. Here’s a quick mood guide:

Blue or green splashbacks: Calm, clean, and refreshing — ideal for relaxing kitchens.

Red or orange splashbacks: Energetic and inviting — perfect for lively, social spaces.

Black or charcoal splashbacks: Sleek and modern — great for industrial or contemporary kitchens.

White or cream splashbacks: Timeless and versatile — suits almost any kitchen style.

Your kitchen is the heart of your home, so pick a splashback colour that feels right for you.


4. Think Beyond Colour: The Right Finish Matters

Even the perfect color can fall flat if the finish doesn’t suit your kitchen’s personality.

Glossy finishes: Reflect light beautifully and are easy to clean — ideal for glass splashbacks.

Matte finishes: Subtle and modern — great for minimalist or industrial looks.

Textured or metallic finishes: Add a unique, high-end touch.

Each material — glass, acrylic, or steel splashbacks — interacts with light differently, so it’s worth considering how the finish will look in your space.


5. Test Before You Order

Before committing to your new splashback, ask your supplier for colour samples or mini panels. View them under your kitchen’s actual lighting and alongside your cabinetry and benchtops. A small test now can save you from disappointment later.


Final Thoughts

Choosing the perfect colour for your kitchen splashback is about balancing design, lighting, and personal taste. Whether you go for a bold coloured glass splashback or a subtle neutral tone, the right choice will completely transform your kitchen — adding beauty, brightness, and personality.

Understanding Splashback Manufacturing Standards

Understanding Splashback Manufacturing Standards

When choosing a splashback — whether for a kitchen, bathroom, or commercial space — most people focus on the design, color, and finish. But behind every beautiful splashback lies an important foundation: manufacturing standards. Understanding these standards not only ensures product quality but also guarantees safety, durability, and long-term satisfaction.


In this post, we’ll unpack what splashback manufacturing standards mean, why they matter, and what those strange codes like EN 12150 and ISO 8442-2 actually stand for.


1. What Are Splashback Manufacturing Standards?


Manufacturing standards are official guidelines that describe how materials should be made, tested, and certified. These standards ensure that splashbacks meet consistent levels of safety, strength, and quality, regardless of the manufacturer.


Each material — glass, acrylic, or stainless steel — has its own set of standards.


2. Key Standards for Different Splashback Materials


a. Glass Splashbacks

Glass splashbacks are sleek, reflective, and easy to clean. But they must also be toughened to handle heat and impact safely.

EN 12150 – Thermally Toughened Safety Glass:

A European standard that ensures glass is properly heat-treated so it’s 4–5 times stronger than normal glass and breaks into small blunt pieces instead of sharp shards.

AS/NZS 2208 – Safety Glazing Materials (Australia/New Zealand):

Confirms glass meets safety performance and impact resistance standards for architectural use.

BS 6206 – Safety Glass for Buildings (UK):

A British standard that tests how glass performs under impact and temperature stress.


Recommended thickness: 6mm for regular kitchen splashbacks; 8mm for larger or high-heat areas.


b. Acrylic Splashbacks

Acrylic panels are lightweight, colorful, and modern-looking. But since they’re plastic-based, they follow a different set of quality and fire safety standards.

ISO 7823-1 – Cast Acrylic Sheets:

An international standard defining the quality, strength, and clarity requirements for acrylic sheets.

EN 13501-1 – Fire Classification of Construction Products:

A European standard that classifies materials based on their fire resistance and smoke production levels.

Acrylic is heat-resistant but not heatproof, so it should never be placed directly behind gas burners without a heat shield.


c. Stainless Steel Splashbacks

Stainless steel splashbacks are durable, hygienic, and easy to clean, making them popular in commercial kitchens.

EN 10088 – Stainless Steel Grades and Composition:

A European standard that specifies which metals (like chromium and nickel) must be used to make corrosion-resistant stainless steel.

ISO 8442-2 – Materials for Food Contact:

An international standard confirming that the metal is safe for surfaces that might touch food or steam, ensuring hygiene and safety.


Most high-quality splashbacks use 304 or 316-grade stainless steel for superior resistance to heat, moisture, and cleaning agents.


3. Why These Standards Matter

Knowing what these standards mean helps you:

. Ensure safety: Materials can withstand heat, impact, and cleaning chemicals.

. Verify durability: Prevents cracking, warping, or corrosion.

. Stay compliant: Meets local building codes and insurance requirements.

. Buy confidently: You know you’re getting a tested, certified product — not a cheap imitation.


4. How to Check If a Splashback Meets Standards


When shopping for a splashback:

Ask for certification documents showing compliance with EN, ISO, AS/NZS, or BS standards.

Check manufacturer datasheets or labels.

Confirm installation instructions — even high-quality materials can fail if installed incorrectly.


5. The Bottom Line

Splashback manufacturing standards aren’t just technical codes — they’re your guarantee of quality, safety, and performance. Whether you choose glass, acrylic, or stainless steel, understanding these labels helps you make smarter choices and avoid costly mistakes.


💡 Quick Reference: What the Codes Mean


EN-European Norm A European standard created by the EU for manufacturing, safety, and performance.

BS-British Standard UK’s official quality and safety guidelines.

AS/NZS-Australian/New Zealand Standard Regional safety and performance standards for building materials.

ISO-International Organization for Standardization Global standards used worldwide to ensure consistency and quality.

"Understanding Splashback Thickness: Does It Matter?"

"Understanding Splashback Thickness: Does It Matter?"

When renovating your kitchen or bathroom, you'll face countless decisions about materials, colors, and finishes. One question that often gets overlooked until you're deep into the selection process is: does splashback thickness actually matter? The short answer is yes—but perhaps not in the ways you might expect.


What Are the Standard Thickness Options?

Splashbacks typically come in several standard thicknesses, depending on the material you choose:

Glass splashbacks are usually available in 4mm, 6mm, and 10mm thicknesses. The 6mm option is the most popular choice for residential applications, offering a good balance between durability and cost.

Acrylic splashbacks generally range from 3mm to 6mm, with 4.5mm being a common standard. These are lighter than glass and can be easier to install.

Stone and tile splashbacks vary more widely, typically ranging from 6mm for thin porcelain tiles to 20mm or more for natural stone.

Durability and Impact Resistance

Thicker doesn't always mean better when it comes to durability. While a 10mm glass splashback will certainly be more impact-resistant than a 4mm version, the difference in everyday use is minimal. Both will withstand normal kitchen activities like splashing water, heat from cooking, and occasional bumps.

The real question is about your specific environment. In a busy family kitchen where pots and pans are constantly in motion, that extra thickness provides peace of mind. In a low-traffic bathroom or a meticulously organized kitchen, a standard thickness will perform perfectly well.

Visual Appearance and Edge Quality

Here's where thickness makes a surprisingly significant aesthetic difference. Thicker splashbacks, particularly glass ones, have more substantial edges that can create a more premium, luxurious appearance. The edge of a 10mm glass panel catches light differently and feels more solid to the touch than a 4mm panel.

This becomes especially noticeable if you're leaving edges exposed rather than tucking them behind cabinetry or benchtops. A polished edge on a thick glass splashback can become a design feature in itself.


Installation Considerations

Thickness directly impacts installation complexity and cost. Thicker, heavier splashbacks require more robust mounting systems and potentially more labor to install safely. A 10mm glass splashback can weigh significantly more than its 4mm counterpart, which might require additional structural support or specialized adhesives.

For DIY enthusiasts, thinner splashbacks are generally more forgiving. They're lighter, easier to handle, and require less specialized equipment to cut and install.

Heat Resistance

In kitchens, heat resistance is a practical concern. Interestingly, thickness has minimal impact on heat resistance for most materials. A 4mm toughened glass splashback will handle heat just as well as a 10mm version—the thermal properties depend more on the glass treatment than its thickness.

However, thicker materials do provide slightly better insulation between your wall and heat sources, which could matter if you're working with older walls or concerned about long-term heat damage.

Cost Implications

Unsurprisingly, thicker materials cost more. Not only is there more material involved, but shipping, handling, and installation costs all increase with thickness. For a standard kitchen splashback, the price difference between 4mm and 10mm glass might add several hundred dollars to your project.

You'll need to weigh whether the benefits—primarily aesthetic and the perception of quality—justify the additional expense for your particular situation.

The Practical Verdict

For most residential applications, standard thickness splashbacks (6mm for glass, 4.5mm for acrylic) are entirely adequate. They're durable enough for everyday use, cost-effective, and easier to install.


Consider upgrading to thicker options if:

You're creating a high-end, luxury kitchen where every detail matters

You have exposed edges that will be visible design features

You're in a commercial setting with heavy use

You want the added peace of mind of extra impact resistance


Conversely, thinner options work well when:

You're working within a tight budget

The splashback will be largely protected by cabinetry

You're installing it yourself

Weight limitations are a concern

Making Your Decision

Ultimately, splashback thickness does matter, but it's rarely the most important factor in your decision. Focus first on choosing the right material, color, and finish for your space. Then consider thickness as a secondary choice that fine-tunes your selection based on your budget, aesthetic preferences, and practical needs.

The best splashback isn't necessarily the thickest one—it's the one that balances all these factors to work perfectly in your specific space and situation. Don't let thickness become a decision-making bottleneck; treat it as one consideration among many in creating your ideal kitchen or bathroom.

How to Keep Your Splashback clean: All you need to know

How to Keep Your Splashback Sparkling Clean

Your kitchen splashback works hard to protect your walls from cooking splatters, grease, and water splashes. But all that protection means it needs regular cleaning to stay looking its best. Here's your complete guide to maintaining a spotless splashback with minimal effort.

Daily Maintenance: The 2-Minute Habit

The secret to a clean splashback isn't intensive scrubbing—it's consistency. After cooking, take just two minutes to wipe down your splashback with a damp microfiber cloth. This prevents grease and grime from building up and becoming stubborn stains. For an extra shine, follow up with a dry cloth to prevent water spots.

Weekly Deep Clean

Once a week, give your splashback a more thorough clean:

For Tile Splashbacks:

 Mix equal parts white vinegar and warm water in a spray bottle. Spray the solution onto your tiles, let it sit for 5-10 minutes, then wipe clean with a microfiber cloth. For grout lines, use an old toothbrush dipped in baking soda paste to gently scrub away discoloration.

For Glass Splashbacks:

Use a glass cleaner or make your own with one part white vinegar to four parts water. Spray generously, then wipe in a circular motion with a lint-free cloth or squeegee from top to bottom to avoid streaks.

For Stainless Steel:

Wipe with warm soapy water in the direction of the grain, then dry thoroughly. For stubborn marks, use a specialized stainless steel cleaner and buff to restore shine.

Tackling Stubborn Grease

Cooking grease is the splashback's biggest enemy. For built-up grease, create a paste using baking soda and a small amount of water. Apply it to greasy areas, let it sit for 15 minutes, then scrub gently with a non-abrasive sponge. The alkaline nature of baking soda cuts through grease naturally without harsh chemicals.

What to Avoid

Protect your splashback by steering clear of abrasive scrubbers, which can scratch surfaces, especially glass and stainless steel. Avoid bleach on colored grout as it can cause discoloration, and never use acidic cleaners on natural stone splashbacks as they can etch the surface.

Pro Tips for Long-Term Care

Install a range hood to reduce the amount of grease reaching your splashback in the first place. Keep a spray bottle of your preferred cleaning solution under the sink for quick access. Most importantly, don't let spills sit—the longer they remain, the harder they become to remove.

A clean splashback doesn't just look better; it's more hygienic and will last longer too.

How Are Glass Splashbacks Fitted? A Complete Installation Guide

How Are Glass Splashbacks Fitted? A Complete Installation Guide

Glass splashbacks have become increasingly popular in modern kitchens and bathrooms, offering a sleek, hygienic, and stylish alternative to traditional tiles. But how exactly are these beautiful glass panels installed? Whether you're considering a DIY project or simply want to understand the process before hiring professionals, this comprehensive guide will walk you through everything you need to know about glass splashback installation.

What Are Glass Splashbacks?

Glass splashbacks are sheets of toughened glass that are fitted to walls behind sinks, hobs, and worktops to protect surfaces from water, grease, and food splashes. Available in virtually any color through back-painting techniques, they provide a seamless, easy-to-clean surface that can make any space appear larger and brighter.

Pre-Installation Preparation

Measuring and Planning

The installation process begins long before any glass touches the wall. Accurate measurements are crucial since glass splashbacks are typically custom-made to fit your specific space. Professional installers will visit your home to take precise measurements, accounting for:

  • Wall dimensions
  • Socket and switch positions
  • Pipes and fixtures
  • Any irregularities in the wall surface

Wall Surface Preparation

The wall surface must be completely flat, clean, and dry before installation. Any bumps, holes, or imperfections need to be addressed, as glass splashbacks require a perfectly smooth surface to adhere properly. This may involve:

  • Filling holes and cracks
  • Sanding down high spots
  • Applying primer if necessary
  • Ensuring the wall is completely level

The Installation Methods

There are several methods for fitting glass splashbacks, each with its own advantages and applications.

Method 1: Adhesive Fixing

This is the most common installation method for glass splashbacks, particularly suitable for areas with minimal heat exposure.

The Process:

  1. The wall is cleaned thoroughly with a degreasing agent
  2. A high-quality structural adhesive (usually silicone-based) is applied to the wall in a zigzag pattern
  3. The glass panel is carefully positioned and pressed firmly against the wall
  4. Temporary supports may be used while the adhesive cures
  5. Excess adhesive is cleaned away immediately

Advantages:

  • Clean, seamless appearance with no visible fixings
  • Quick installation process
  • Suitable for most residential applications

Method 2: Mechanical Fixing

For areas exposed to high heat (like directly behind hobs) or in commercial settings, mechanical fixings provide additional security.

The Process:

  1. Mounting points are marked and drilled into the wall
  2. Appropriate wall plugs or anchors are installed
  3. The glass panel is fitted with special mounting hardware
  4. The glass is secured to the wall using screws or bolts
  5. Cover caps are fitted to hide the fixing points

Method 3: Combination Method

Many professional installations use both adhesive and mechanical fixings for maximum security and longevity.

Step-by-Step Installation Process

Step 1: Final Measurements and Checks

Even with pre-measured glass, installers will double-check all dimensions and wall conditions before proceeding.

Step 2: Safety Preparation

Professional installers will lay protective coverings on floors and worktops and ensure proper ventilation if adhesives are being used.

Step 3: Applying the Adhesive

High-grade structural adhesive is applied evenly across the wall surface, typically in vertical strips or a zigzag pattern to ensure complete coverage without air pockets.

Step 4: Positioning the Glass

This is the most critical step. The glass panel, which can be heavy and unwieldy, is carefully maneuvered into position. Professional installers typically use suction cup lifters to handle large panels safely.

Step 5: Pressing and Securing

Once positioned, the glass is pressed firmly against the wall to ensure good contact with the adhesive. Any air bubbles are worked out from behind the glass.

Step 6: Temporary Support

Depending on the installation method and adhesive used, temporary supports may be installed to hold the glass in place while the adhesive cures.

Step 7: Sealing and Finishing

The edges of the glass splashback are sealed with appropriate sealant to prevent moisture ingress. This is particularly important around sinks and wet areas.

Step 8: Final Cleaning

The glass surface is thoroughly cleaned to remove any fingerprints, adhesive residue, or installation marks.

Special Considerations

Electrical Outlets and Switches

Glass splashbacks can be fitted around existing electrical outlets and switches. This requires precise cutting of the glass, which must be done during manufacture. The areas around electrical fittings are carefully sealed to maintain the splashback's protective function.

Heat Considerations

When installing behind hobs or ovens, special heat-resistant adhesives must be used, and adequate ventilation space should be maintained between the glass and heat source.

Plumbing and Fixtures

Existing plumbing and fixtures can usually remain in place during installation, with the glass cut to fit around them. However, some situations may require temporary removal of fixtures.

Tools and Materials Required

Professional installation requires specialized tools and materials:

  • High-quality structural adhesive
  • Professional glass handling equipment (suction lifters)
  • Measuring tools and levels
  • Cleaning materials and degreasers
  • Sealants and finishing materials
  • Safety equipment including gloves and eye protection

Installation Timeline

A typical glass splashback installation follows this timeline:

  • Initial consultation and measuring: 1-2 hours
  • Glass manufacturing time: 7-28 days
  • Installation appointment: 2-4 hours depending on complexity
  • Curing time: 24-48 hours before full use

Maintenance After Installation

Once installed, glass splashbacks require minimal maintenance:

  • Regular cleaning with standard glass cleaners
  • Avoid abrasive materials that could scratch the surface
  • Check sealant annually and reapply if necessary
  • Professional re-sealing may be required every few years in wet areas

Cost Considerations

The cost of glass splashback installation varies depending on:

  • Size and complexity of the installation
  • Type of glass and finish chosen
  • Local labor rates
  • Accessibility of the installation area
  • Any additional preparation work required

Common Installation Challenges

Professional installers are equipped to handle various challenges:

  • Uneven walls: May require additional preparation or shimming
  • Complex cutting requirements: Around multiple outlets or irregular shapes
  • Access difficulties: In tight spaces or awkward locations
  • Existing fixture integration: Working around plumbing and electrical fittings

Conclusion

Glass splashback installation is a precise process that transforms the look and functionality of kitchens and bathrooms. While the concept may seem straightforward, the reality involves careful planning, precise measurement, proper surface preparation, and skilled installation techniques.

The combination of custom manufacturing, specialized tools, and professional expertise typically makes professional installation the best choice for most homeowners. The result is a stunning, durable, and practical addition to your home that will provide years of easy maintenance and visual appeal.

Whether you choose a bold colored glass to create a focal point or a subtle neutral tone to complement existing décor, a professionally fitted glass splashback is an investment in both style and functionality that will enhance your living space for years to come.

Remember: Always consult with qualified professionals for glass splashback installation to ensure safety, proper fit, and warranty protection.

Can You Put a Glass Splashback on Top of Tiles? Everything You Need to Know

Can You Put a Glass Splashback on Top of Tiles? Everything You Need to Know

When renovating your kitchen or bathroom, you might find yourself wondering whether you can install a sleek glass splashback over your existing tiles. The good news is that in many cases, the answer is yes – but there are important considerations to keep in mind before diving into this project.

The Short Answer: Yes, But With Conditions

You can install a glass splashback over tiles, but success depends on several key factors including the condition of your existing tiles, the type of adhesive used, and proper surface preparation. While it's technically possible, it's not always the best approach for every situation.

When Installing Over Tiles Works Well

Ideal Conditions for Tile-Over Installation

Installing glass splashbacks over existing tiles works best when your current tiles are in excellent condition. The tiles should be firmly attached to the wall with no loose pieces, cracks, or signs of water damage. Flat, smooth ceramic or porcelain tiles provide the ideal surface for this type of installation.

Small format tiles with minimal grout lines tend to work better than large tiles with deep grout joints. The more level and uniform your existing surface, the better your glass splashback will adhere and look once installed.

Benefits of This Approach

The primary advantage of installing over existing tiles is convenience and cost savings. You'll avoid the messy, time-consuming process of tile removal, which can damage walls and require extensive repairs. This approach also reduces waste and can be completed more quickly than a full removal and replacement project.

For rental properties or situations where you want a temporary upgrade, installing over tiles can be an attractive option that doesn't permanently alter the underlying structure.

Challenges and Potential Problems

Surface Preparation Requirements

The biggest challenge when installing glass over tiles lies in surface preparation. Grout lines create an uneven surface that must be properly addressed to ensure the glass adheres correctly. If the grout joints are deep or the tiles are textured, you may need to apply a leveling compound or primer specifically designed for this type of installation.

Any loose grout should be removed and replaced, and the entire surface must be thoroughly cleaned and degreased. Even small imperfections can create air bubbles or weak spots that may cause the splashback to fail over time.

Weight and Support Considerations

Glass splashbacks are heavier than many people realize, and adding this weight to an existing tiled surface requires careful consideration of the wall's load-bearing capacity. If your tiles are already showing signs of stress or if the wall substrate is questionable, adding a glass splashback could exacerbate existing problems.

The adhesive bond is only as strong as the weakest link in the chain – if your existing tiles aren't perfectly secure, the entire installation could fail.

Professional Installation vs. DIY

When to Call the Professionals

While some experienced DIYers might tackle this project, professional installation is often worth the investment when installing over tiles. Professionals have access to specialized adhesives and techniques that ensure proper bonding to irregular surfaces. They can also assess whether your existing tiles are suitable for this type of installation.

Professional installers typically offer warranties on their work, providing peace of mind that a DIY installation might not provide. If your splashback fails due to improper installation, the cost of removal and reinstallation often exceeds the initial savings of doing it yourself.

DIY Considerations

If you decide to proceed with a DIY installation, invest in high-quality structural adhesive specifically designed for glass-to-tile applications. Standard construction adhesive may not provide adequate bonding strength for this application.

Take time to properly assess your existing tiles and be honest about their condition. If there are any doubts about the stability of your current installation, it's better to remove the tiles and start fresh.

Alternative Solutions to Consider

Complete Tile Removal

In many cases, removing existing tiles and starting with a clean, flat surface produces better long-term results. While this approach requires more time and effort upfront, it eliminates potential bonding issues and ensures your glass splashback has the best possible foundation.

Modern tile removal tools and techniques have made this process more manageable for DIY enthusiasts, and the superior end result often justifies the additional work.

Other Splashback Materials

If installing glass over your existing tiles seems problematic, consider alternative splashback materials that are more forgiving of uneven surfaces. Stainless steel, acrylic panels, or even painted glass alternatives might be easier to install over tiles while still providing an updated, modern look.

Making the Right Decision for Your Project

The decision to install a glass splashback over existing tiles depends on your specific situation, budget, and long-term goals. If your tiles are in excellent condition and you're comfortable with the potential risks, this approach can provide beautiful results at a lower cost than complete removal.

However, if you're planning to stay in your home long-term or if your existing tiles show any signs of problems, investing in proper tile removal and surface preparation will likely provide better results and peace of mind.

Before making your final decision, consider consulting with a professional installer who can assess your specific situation and provide personalized recommendations based on your tiles' condition and your project goals.

Conclusion

While you can put a glass splashback on top of tiles, success requires careful planning, proper materials, and realistic expectations about the challenges involved. Whether you choose to install over existing tiles or start fresh with a clean surface, the key is making an informed decision based on your specific circumstances and long-term objectives.

Remember that a splashback is not just a design element – it's a functional component that needs to perform reliably for years to come. Taking the time to do it right, whether that means working over tiles or starting from scratch, will ensure you get the beautiful, durable result you're looking for.

How to Stick a Glass Splashback to a Wall: A Complete Installation Guide

How to Stick a Glass Splashback to a Wall: A Complete Installation Guide

Glass splashbacks have become increasingly popular in modern kitchens and bathrooms, offering a sleek, hygienic, and easy-to-clean alternative to traditional tiles. While professional installation is often recommended, many homeowners can successfully install glass splashbacks themselves with the right preparation, tools, and technique. This comprehensive guide will walk you through the entire process.

What You'll Need

Tools Required

  • Spirit level (at least 600mm long)
  • Measuring tape
  • Pencil for marking
  • Electric drill with masonry bits
  • Screwdriver
  • Clean cloths and paper towels
  • Rubber gloves
  • Safety glasses
  • Dust mask

Materials Needed

  • Glass splashback (pre-cut to size)
  • Wall plugs and screws (if using mechanical fixings)
  • Neutral cure silicone sealant (clear or matching color)
  • Degreasing agent or methylated spirits
  • Masking tape

Step 1: Preparation is Key

Measure and Plan

Before anything else, carefully measure your wall space and ensure your glass splashback is the correct size. Double-check all measurements, as glass cannot be easily trimmed once purchased. Consider the position of electrical outlets, switches, and any fixtures that may affect installation.

Prepare the Wall Surface

The wall surface must be completely flat, clean, and dry. Remove any old tiles, wallpaper, or loose paint. Fill any holes or cracks with appropriate filler and sand smooth once dry. The wall should be painted with a suitable primer and paint before installation, as you won't be able to paint behind the glass once it's installed.

Check for Level and Plumb

Use your spirit level to check that the wall is perfectly vertical and that any horizontal surfaces (like countertops) are level. Any irregularities will be magnified once the glass is installed.

Step 2: Mark Your Position

Using your measuring tape and spirit level, carefully mark the exact position where your glass splashback will be installed. Use a pencil to mark the corners and create reference lines. Double-check these measurements against your glass panel.

If you're installing multiple panels, ensure the gaps between them are consistent and level. Typically, a 2-3mm gap is left between panels for expansion and sealant.

Step 3: Apply the Adhesive

Choose the Right Adhesive

For glass splashbacks, use a high-quality Neutral cure silicone sealant. Avoid standard construction adhesives, as they may not provide adequate bond strength or could damage the glass backing.

Application Technique

Apply the adhesive in vertical strips or dots across the back of the glass, approximately 150-200mm apart. Avoid applying adhesive too close to the edges, as it may squeeze out when pressure is applied. Leave the adhesive about 25mm from all edges.

For areas behind cooktops or other heat sources, ensure your adhesive is rated for high temperatures.

Step 4: Position and Secure

Lifting and Positioning

Glass splashbacks can be heavy and awkward to handle. If possible, have a helper assist with positioning. Lift the glass carefully, avoiding twisting or bending, and align it with your marked reference points.

Apply Pressure

Once positioned correctly, apply firm, even pressure across the entire surface of the glass. Use a clean, flat tool like a wallpaper smoothing brush or rubber roller to ensure good contact between the adhesive and wall. Work from the center outward to expel any air bubbles.

Check Alignment

Continuously check that the glass remains level and properly aligned during this process. You typically have 10-15 minutes of working time before the adhesive begins to set, depending on temperature and humidity.

Step 5: Temporary Support (If Needed)

For larger or heavier panels, you may need temporary support while the adhesive cures. This can be achieved using:

  • Temporary brackets screwed into the wall below the glass
  • Props or supports from the floor
  • Masking tape to hold edges in place

Ensure any temporary supports don't put stress on the glass that could cause cracking.

Step 6: Seal the Edges

Once the glass is securely positioned and the adhesive has had time to set (usually 24 hours), apply silicone sealant around all edges. This prevents moisture ingress and provides a professional finish.

Use masking tape to create clean, straight lines, and tool the sealant with your finger or a specialized tool for a smooth finish. Remove the masking tape while the sealant is still wet.

Step 7: Final Cleaning

Clean the glass surface with a suitable glass cleaner, removing any fingerprints, adhesive residue, or sealant smears. Use a lint-free cloth for the best finish.

Important Safety Considerations

Glass Handling

Always wear safety glasses and gloves when handling glass. Toughened glass, while safer than standard glass, can still cause injury if it breaks. Never carry glass panels on your own if they're large or heavy.

Electrical Safety

If your installation area includes electrical outlets or switches, ensure the power is turned off before beginning work. Consider having an electrician relocate or extend outlets if necessary.

Weight Limitations

Ensure your wall can support the weight of the glass splashback. Plasterboard walls may require additional reinforcement or different fixing methods.

Common Mistakes to Avoid

Poor Surface Preparation

Rushing the wall preparation stage is the most common cause of installation failure. Take time to ensure the surface is perfectly clean, flat, and dry.

Incorrect Adhesive Choice

Using the wrong type of adhesive can result in poor adhesion or damage to the glass backing. Always use products specifically designed for glass applications.

Inadequate Support During Curing

Failing to provide adequate support while the adhesive cures can result in the glass sliding or falling, potentially causing injury and damage.

Over-application of Sealant

Applying too much sealant around edges can create an unprofessional appearance and may be difficult to clean.

Maintenance Tips

Once installed, glass splashbacks are relatively low-maintenance. Clean regularly with appropriate glass cleaners, avoid abrasive cleaners or tools that could scratch the surface, and check sealant periodically for any signs of deterioration.

When to Call a Professional

While many homeowners can successfully install glass splashbacks, consider professional installation if:

  • You're working with very large or heavy panels
  • Complex cuts around outlets or fixtures are required
  • You're uncomfortable working with glass
  • The installation involves structural modifications
  • Local building codes require professional installation

Conclusion

Installing a glass splashback can transform your kitchen or bathroom while providing a practical, hygienic surface that's easy to maintain. With careful preparation, the right materials, and attention to detail, this can be a rewarding DIY project. Remember that patience during the preparation and curing stages is crucial for a successful, long-lasting installation.

The key to success lies in thorough preparation, using quality materials, and taking your time throughout each step of the process. If you're unsure about any aspect of the installation, don't hesitate to consult with professionals who can ensure your splashback is installed safely and correctly.

Are Glass Splashbacks Worth It? A Complete Guide to Making the Right Choice

Are Glass Splashbacks Worth It? A Complete Guide to Making the Right Choice

When renovating your kitchen, the splashback might seem like a minor detail compared to choosing cabinets or appliances. However, this seemingly small design element can dramatically impact both the functionality and aesthetics of your space. Glass splashbacks have surged in popularity over recent years, but are they actually worth the investment? Let's explore everything you need to know to make an informed decision.

What Are Glass Splashbacks?

Glass splashbacks are protective panels installed behind cooktops, sinks, and work surfaces to shield walls from water, grease, and food splatters. Unlike traditional tiles, they consist of a single sheet of toughened glass that's custom-cut to fit your kitchen's dimensions. They can be clear, coloured, printed with patterns, or even back-painted in virtually any shade you can imagine.

The Compelling Advantages

Seamless Cleanliness

Perhaps the most significant advantage of glass splashbacks is their hygiene factor. With no grout lines or joints where bacteria and grime can accumulate, cleaning becomes remarkably simple. A quick wipe with glass cleaner or even just soapy water restores them to their original sparkle. This makes them particularly appealing for serious home cooks who deal with frequent splattering and steam.

Visual Impact

Glass splashbacks create an undeniable sense of space and light in your kitchen. They reflect natural light around the room, making even compact kitchens feel more open and bright. The seamless surface creates clean, uninterrupted lines that work beautifully with both modern and traditional kitchen designs. When back-painted in bold colors, they can serve as stunning feature walls that tie your entire color scheme together.

Durability That Lasts

Made from toughened safety glass, these splashbacks are built to withstand the daily rigors of kitchen life. They resist heat, won't fade from sunlight exposure, and maintain their appearance for decades. Unlike painted walls that might need touch-ups or tiles that can crack, glass splashbacks offer genuine longevity.

Customization Options

The design possibilities are virtually endless. You can choose from clear glass that showcases beautiful wall colors or textures behind it, solid colors that make bold statements, or even printed designs including photography, patterns, or artistic motifs. Some manufacturers offer anti-glare coatings or textured finishes for added functionality and visual interest.

The Potential Drawbacks

Higher Initial Investment

Glass splashbacks typically cost more upfront than ceramic tiles or painted surfaces. Custom cutting, professional installation, and the specialized materials involved contribute to higher initial expenses. However, many homeowners find this cost is offset by the longevity and reduced maintenance requirements over time.

Professional Installation Required

Unlike tiles that skilled DIYers might tackle themselves, glass splashbacks require professional measurement and installation. The glass must be precisely cut to accommodate outlets, switches, and fixtures, leaving no room for error. This necessity for professional service adds to the overall project cost.

Showing Every Mark

While glass is easy to clean, it also shows every fingerprint, water spot, and smudge more readily than textured surfaces. Households with young children or those who prefer low-maintenance surfaces might find the frequent cleaning requirements frustrating.

Limited Repair Options

If damaged, glass splashbacks typically need complete replacement rather than simple repairs. While the toughened glass is quite durable, a significant impact could necessitate replacing an entire panel, which can be costly and inconvenient.

Cost Considerations

Glass splashback costs vary significantly based on size, customization, and installation complexity. Basic clear glass typically starts around £100-150 per square meter, while colored or printed options can range from £200-400 per square meter. Factor in professional installation costs of £100-200, and a typical kitchen splashback might cost £600-1,500 total.

While this represents a significant investment compared to standard tiles (£30-80 per square meter), many homeowners find the long-term benefits justify the initial expense.

Making the Decision: Are They Right for You?

Glass splashbacks are particularly worthwhile if you:

  • Value easy maintenance and superior hygiene
  • Want to maximize light and create a sense of space
  • Appreciate modern, streamlined aesthetics
  • Plan to stay in your home long-term to benefit from their durability
  • Enjoy bold design statements or custom visual elements

They might not be the best choice if you:

  • Have a limited renovation budget
  • Prefer DIY installation options
  • Don't mind regular grout cleaning and maintenance
  • Worry about showing fingerprints and water marks
  • Live in a rental property or plan to move soon

The Bottom Line

Glass splashbacks represent a premium kitchen feature that delivers genuine practical and aesthetic benefits. While they require a higher initial investment than traditional alternatives, their combination of easy maintenance, durability, and visual impact makes them a worthwhile upgrade for many homeowners.

The key is ensuring they align with your lifestyle, budget, and design preferences. If you value sleek, modern aesthetics and appreciate the convenience of easy cleaning, glass splashbacks can be an excellent long-term investment that enhances both your daily kitchen experience and your home's value.

Before making your final decision, visit kitchen showrooms to see various glass splashback options in person, get multiple quotes from reputable installers, and consider how the investment fits into your overall renovation budget. With proper planning, a glass splashback can become one of your kitchen's most satisfying and enduring features.

Stunning Glass Splashbacks: 15 Reasons They’re a Must-Have for Modern Kitchens (2025 Guide)

Introduction to Glass Splashbacks

If you’re redesigning your kitchen in 2025, one feature that continues to stand out in modern homes is glass splashbacks. Not only do they provide a sleek, contemporary look, but they’re also practical, hygienic, and incredibly easy to maintain. Unlike traditional tiles that can trap grease and dirt in grout lines, glass offers a seamless finish that’s both stylish and functional.

More homeowners are now turning to DIY Splashbacks (diysplashbacks.co.uk) to get customized designs delivered straight to their doors—making it easier than ever to achieve a designer kitchen look without the hefty price tag.


Why Choose Glass Splashbacks Over Tiles or Acrylic?

Durability and Longevity

Glass splashbacks are built to last. With toughened safety glass, they can withstand daily wear and tear, heat from cooking, and moisture from kitchen activities without cracking or warping.

Hygienic and Easy to Clean

Say goodbye to scrubbing dirty grout lines. A quick wipe with a microfiber cloth keeps glass spotless, making it perfect for busy households.

Sleek and Modern Aesthetic

Whether you prefer bold colours, subtle shades, or mirrored finishes, glass splashbacks offer a luxury aesthetic that instantly elevates your kitchen design.


The Benefits of Installing Glass Splashbacks

Heat and Moisture Resistance

Unlike acrylic, which can warp, glass remains unaffected by steam, splashes, and direct heat from hobs.

Wide Range of Custom Colours and Designs

From classic neutrals to vibrant printed patterns, DIY Splashbacks allows you to personalize your splashback to suit your unique taste.

Adds Light and Space to Your Kitchen

Reflective surfaces create an illusion of space, making even compact kitchens feel more open and airy.


Kitchen Design Trends with Glass Splashbacks (2025 Edition)

Bold Colour Choices

Deep blues, forest greens, and matte blacks are trending for homeowners seeking a dramatic statement.

Printed and Patterned Splashbacks

DIY Splashbacks offers digitally printed designs, including cityscapes, nature scenes, and geometric patterns, perfect for adding character.

Metallic and Mirror Finishes

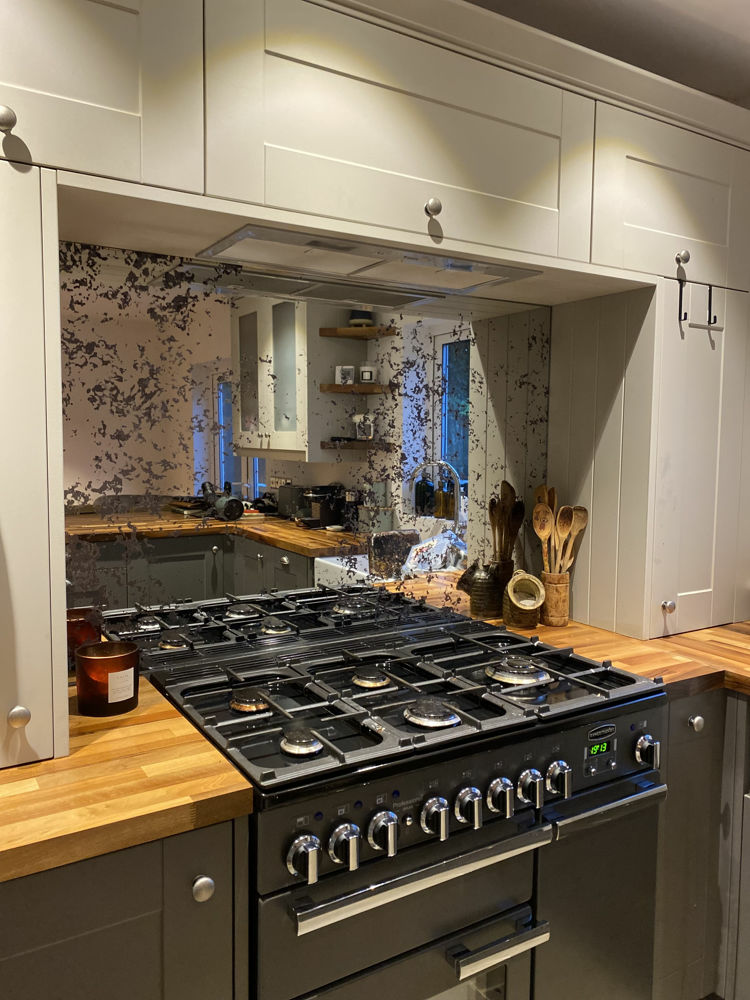
Mirror splashbacks are on the rise, giving kitchens a glamorous, high-end vibe.

Quatrefoil Mirror Splashback


Custom Glass Splashbacks from DIY Splashbacks

If you want a splashback tailored to your kitchen, DIY Splashbacks is the go-to supplier in the UK.

Made-to-Measure Options

No two kitchens are alike. DIY Splashbacks provides bespoke sizing to ensure a perfect fit, whether for a compact apartment or a spacious open-plan home.

Online Ordering Process

Their website makes it easy—simply input your measurements, choose your design, and order online.

Affordable and Professional Quality

Compared to hiring a specialist, DIY Splashbacks offers premium quality at a fraction of the cost.


Step-by-Step Guide: How to Install a Glass Splashback Yourself

DIY Splashbacks products are designed for easy self-installation.

Tools and Materials You’ll Need

  • Spirit level

  • Adhesive/sealant

  • Measuring tape

  • Safety gloves

Measuring and Preparing Your Wall

Accurate measurements are key. Ensure your wall is flat, dry, and clean before installation.

Fitting and Sealing the Splashback

Apply adhesive evenly, press the glass into place, and seal edges with silicone for a polished finish.

fitting-guide


Cost of Glass Splashbacks in 2025

Factors That Influence Price

  • Size of splashback

  • Choice of colour or print

  • Type of glass (standard, mirror, or toughened)

Comparing DIY vs Professional Installation

Ordering from DIY Splashbacks can save hundreds in labour costs, while still giving you professional-grade results.


Maintenance Tips for Long-Lasting Glass Splashbacks

Cleaning Solutions and Techniques

Use a mild glass cleaner or vinegar-water solution. Avoid abrasive pads.

Preventing Scratches and Damage

Always use chopping boards instead of prepping directly against the splashback.


FAQs About Glass Splashbacks

Q1. Are glass splashbacks heat resistant?
Yes, toughened glass can withstand high cooking temperatures.

Q2. Can I install a glass splashback myself?
Yes! With DIY Splashbacks’ easy-to-follow instructions, many homeowners install them without professional help.

Q3. Do glass splashbacks come in different colours?
Absolutely. DIY Splashbacks offers a wide palette, from solid colours to photo prints.

Q4. How do I measure for a splashback?
Use a tape measure for accurate wall dimensions. DIY Splashbacks’ website provides a step-by-step measuring guide.

Q5. Are glass splashbacks expensive?
Prices vary, but they’re cost-effective compared to tiles when you consider durability and ease of cleaning.

Q6. Where can I buy glass splashbacks online?
You can order directly from DIY Splashbacks, a trusted UK supplier.


Conclusion: Why Glass Splashbacks are the Future of Kitchen Design

Glass splashbacks aren’t just a passing trend—they’re a smart investment for homeowners who want elegance, durability, and easy maintenance. With suppliers like DIY Splashbacks, you can access custom, affordable, and stylish solutions that bring your dream kitchen to life.